
I don’t know about you, but since Tales this year I have been hearing about Clarified Juices on mixology blogs and craft cocktail sites all over the place. This week, my curiosity got the best of me and I decided to give it a try with lime juice.

What You Will Learn:
- Why your bottle-carbonated cocktail program needs clarified juice
- Two different ways to mess up your Clarification (From experience!)
- How juice clarification impacts taste
How it’s Done:
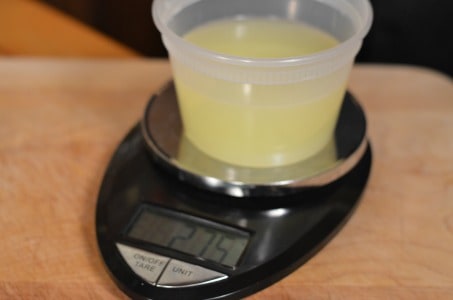
Lime Juice weight and Preparation:
- Juice limes
- Typically, we use ounces when making drinks but this time we measure it by weight.
- Grab your gram scale and place your container.
- Adjust your gram scale to zero (while the container is on top)
- Fine-strain the juice to remove as much pulp as possible.
- Make a note of how much juice you have. You’ll need that in step 2:
Hydrating Agar Agar:
By the way – here’s a link to some good Agar Agar on Amazon (Affiliate link.)
- Measure out water to get exactly one half as much water as you had lime juice. We’ll use this to bloom the Agar Agar.
- Now you’ll need to measure out enough Agar Agar to make 2% of the total liquid – the weight of the lime juice and the water.
- Put the cold water into a sauce pan and add the agar agar to the cold liquid.
- Turn on the heat to medium and whisk as the mixture heats.
Incorporating Lime Juice and Agar agar:
By the way – here’s a link to some good Agar Agar on Amazon (Affiliate link.)
- Slowly stream the lime juice into the agar agar whisking the entire time, keeping the temperature above 35 degrees Celsius
- Prepare an ice bath by putting ice and water in a large bowl, then placing a smaller bowl in it.
- Pour the heated mixture into the smaller bowl and whisk until it gets to the consistency of cottage cheese.
- Allow the mixture to set for around 15 minutes.
Separating Lime Juice from Agar Curds:
- Wet a piece of overlapping cheesecloth or linen (I used linen.)
- Pour the set mixture into the cloth
- Pick it up inside the cloth and apply gentle pressure to slowly work the clarified juice out. Don’t squeeze too hard or your clarified juice will end up with some Agar in it.


The Results:
Clearly (pun intended) we didn’t get the juice 100% clear, but it did make a difference when compared to the control. I’ll definitely keep you updated if I can find more or better methods to try.
Have you clarified citrus juice, this way or with a centrifuge? Tell us about it in the comments!
Click Here to view the Transcript
Hi, this is Chris from ABarAbove.com and today we’re going to learn how to clarify lime juice. So stay tuned!
So the first time I heard about juice clarification was actually at Tales of the Cocktail cocktail. I was in a class on Hydrocolloids and the presenter actually mentioned it. He didn’t really go into too much detail but just as a pure coincidence, the class ahead afterwards was on bottle-carbonated cocktails. The presenter there actually went into some pretty specific detail about the process of clarifying juices and the importance of it on bottle-carbonated cocktails. And the reason that he gave was that when you’re carbonating any kind of cocktail or anything in general, you wanted the liquid to be as pure as possible. So for example, if you have pulp in there, it’s gonna foam up on you because what happens is that pulp actually captures air and puts it into the drink and have these tiny microscopic bubbles all around it. When you carbonate it, you’re actually introducing more bubbles into the system there. And the thing that kind of blew my mind when he said it was that bubbles can only form around other bubbles. And he actually called them nucleation sites. So if you have nucleation site of lime pulp in there, it’s gonna create bubbles. So it’s really, really fascinating to hear that.
Now, for any of you that have worked with Duvel the beer and if you have any of the Duvel glasses, one of the coolest things about that glass—you probably won’t even notice it until you know what to look for—is right at the dents under the glass, at the very bottom, they actually etched a “D” to create an imperfection in the glass for which the bubbles will start to form in. And if you leave the beer there long enough, the plume of bubbles that come up through the beer will actually form a “D” in the top of the beer. It’s kind of cool and you really have to look for but it’s definitely there, so it’s something fascinating to keep in mind. So how it affects this with cocktails, we’re gonna go into or we’re gonna go through the process with you. And we’re gonna learn some of the benefits and some of the limitations of clarifying lime juice for designing cocktails. So I’m really excited to provide some of this information for you and learn myself. It’s going to be a fun process.
So what we’re gonna do now is just get everything ready and juice some limes. So now that we’ve juiced all of our limes, we’re gonna go about using a different method of measurement than we’re used to using behind the bar. Typically, when we’re creating cocktails or making drinks, we use fluid ounces—so one ounce (1 oz.) lime juice, half an ounce (0.5 oz.) lime juice, three-quarters ounce (3/4 oz.) lime juice, whatever the measurement is. Now that we’re using gelatin or Agar Agar to make clarified lime juice, we actually need to go by weight, because Agar Agar depends on weight and not by actual volume. So how we’re gonna do this is, I have a gram scale here—so you’ll need to have a gram scale here—I’m gonna turn it on and put on my measuring device, whatever that’s gonna hold my lime juice. So it’s gonna weigh that and now I’m gonna zero it out, so as of now, my scale is zero. So it’s only measuring the volume, I mean, the weight of the lime juice. I’m gonna fine strain this to remove as much pulp—before I add it to the Agar—as possible and we’ll get a final reading from the lime juice and proceed from there.
So now that we’ve pressed and weighed out our lime juice, the next step is going to be to essentially bloom the Agar Agar like we would the gelatin. And how we would do that is to heat up the liquid and add 0.2% by weight of Agar Agar and let it dissolve and hydrate into the mix. You don’t want to do that with lime juice since it’s so temperature sensitive. So what we’re gonna do is actually to use water to bloom the Agar Agar. So what I’m gonna do now is I’ll measure out half the volume that we have of lime juice. So we had 275 grams of lime juice, I’m going to weigh out 137.5 grams of water and that’s what I’m gonna use to hydrate my Agar Agar.
So now we’re gonna hydrate the Agar Agar and we’re gonna do that by adding our water to the sauce pan and adding our Agar Agar straight to the cold liquid. And now we’re gonna add a flame to it and just let it start to hydrate while whisking.
So now that we have the Agar bloomed, we’re just gonna slowly start to incorporate the lime juice to it. Just a slow steady stream while whisking the entire time. And the important thing is, you don’t want this to fall below 35°C or the bloom or the gelatin will start to set, the Agar will start to set prematurely and you won’t get the finished product that you mean.
Great. So now we’re just gonna chill down our lime-Agar solution. What we have in the bowl is just some ice in the water—I prepared an ice bath for it—and essentially we’re just gonna set it. So now continue to stir this until you start to get this consistency of cottage cheese. As you can see, the Agar and lime juice have set through a nice consistency, so now we’re just gonna separate the juice from the Agar curds. And how we’re gonna do that is just get a piece of linen or cheesecloth—I’ve actually pre-wet this so that the water or the lime juice doesn’t have to hydrate the napkin and so we’ll get a better yield out of the product. So essentially, that’s all I’ve done, so let’s just see how this process has worked out.
And now for the fun part: David Arnold from Cooking Issues has a really interesting way or technique that he calls “massaging the sack.” So what I’m gonna do is just not push too hard because you don’t want to push the gelatin or any of these separative material through though the napkin. So essentially, you just have to do a low pressure on it. Here’s a closer look on the product that we’re getting out of the clarification process and you can see how clear it actually is.
So now that we’ve done the clarification—I’ve actually done this experiment three (3) different times here—I’m just gonna go down the line and explain kind of what I learned, some of the mistakes I made, and the final product that we came out with. So this one here is actually just a regular lime juice—the lime juice that we’re used to working with behind the bar. You can see it’s not very clear, it has some pulp in there, but this is what we traditionally use on a daily basis.
This one here is my first attempt at clarification—it turned out really well. One of the things I think I did incorrectly though is squeezed the Agar solution a little too hard in the final step. I was a too excited about it and I actually think I pushed a little bit of the color through the Agar solution and back into the lime juice, so it’s not quite the clarity that I was hoping for, but it’s still much better than the lime juice that is just natural, fresh pressed lime juice.
Now this one here is my second attempt at clarification—I tried to get the color to an even better level and I definitely achieved that. But one of the things that happened during this clarification process is, during the point where the Agar starts to set like a gelatin, I continuously whipped it or broken apart with the whisk and it didn’t have enough time to set in my opinion. So what happened is that when I went to go and push the Agar solution through the cloth, the Agar actually went through the cloth because it was still kind of in liquid form and it wasn’t fully set, and then it actually began to set in the glass here. So don’t be hasty; let the Agar solution have enough time to set and you won’t have this problem.
So the last one here was—the reason it’s so low is actually because I only have a little bit of product left—about half the volume as I did in the beginning, as most of the other ones here. But it definitely achieved the best overall result for me and I did kind of a combination of everything: so I kind of whisked the gelatin or the Agar I was setting and then I let it sit for an additional 15 minutes so it really, really set well and then I pushed it through the linen cloth with really mild pressure.
One of the things I like to do in the future is to take away many of the variables as possible with clarification of lime juice. So the first one that comes to mind is actually that last process when you’re squeezing the lime juice through cheesecloth, there are a lot of variable involved there: how much pressure do I apply? How long? You know, it’s hard to replicate those kind of things every single time. The first thing that comes to mind is actually putting cheesecloth in a perforated hotel pan, putting your lime curd above the top of it, putting a baking sheet on top of that, and putting a pre-determined amount of weight on top. So that way it takes away the very variables of how much pressure to apply. Not only that, but it enables you to do something better with your time than to squeeze the lime juice through your cheesecloth. Now one of the things that I’ve noticed with the clarified lime juice is that it’s not as vibrant and it’s not as, like, alive and electric as regular lime juices. So what I mean by that is the acidity definitely falls off and you don’t get that vibrant fragrance that you get from fresh lime juice. So if you’re bottle-carbonating, one of the benefits to that is that you’re actually adding more acid into the system by the carbonation, so it’ll definitely take care of the acidity problem for you. But now, if you’re gonna make any clarified margaritas or gimlets, this is a problem you’re gonna have to address. Some of the things that come into my mind on this topic is the possibility of possibly adding powdered citric acid to your mix and even fresh lime oil to the batch. So this might help to overcome some of the problems with the fall off on the acidity.
But either way, I’m gonna be exploring these topics in the future and I will look forward to bring them to everybody. But until then, I hope everybody has a great shift and cheers!


Hmm it seems like your site ate my first comment (it
was super long) so I guess I’ll just sum it up what I wrote and say, I’m thoroughly enjoying
your blog. I as well am an aspiring blog blogger but
I’m still new to everything. Do you have any tips for first-time blog writers?
I’d certainly appreciate it.
Hello – sorry about missing your first comment. This is Julia, I’m Chris’ wife and the one who manages the website. As far as the platform, we’re on WordPress (which I highly recommend). I would say my best advice for first-time bloggers is to just start writing for a few weeks with a free Tumblr blog and see how you like it. If you’re still enjoying it, I’d invest in a domain & install wordpress and just get started! We learned everything we know from Google, & YouTube & trial-and-error, and I think the best way to leanr is to just get started. If you’d like to chat further, feel free to email me at Julia@ABarAbove.com. Thanks for your comment!
Chris,
In this tutorial you use agar agar as opposed to an animal
based gelatin. Is this because the agar
agar collects the “bubbles” better than its animal based cousin or do they both
do the same job but by using the agar, thery’ll be zero customer complications as
far as ingredients?
Thanks
Great question Steven,
I actually used the techniques that were originated from David Arnold where he outlines using agar agar. I could see experimenting with other gelatin types to see if there is better results in our future 🙂